The Mer Wiki now uses your Mer user account and password (create account on https://bugs.merproject.org/)
Platform SDK on VirtualBox
(→Storage and Sharing your home, source and caches) |
(→Storage and Sharing your home, source and caches) |
||
| Line 74: | Line 74: | ||
Folder name: home | Folder name: home | ||
and if you want to login via ssh to mersdk you also need to share your private mer-qt-creator-rsa key folder: | and if you want to login via ssh to mersdk you also need to share your private mer-qt-creator-rsa key folder: | ||
| + | '''Notice! this is a security risk if you let others login to the same mersdk you should NOT use $USER/.ssh folder. instead move mer-qt-creator private key elsewhere. Because you don't want others to see the other private keys.''' | ||
Folder path: <your home directory/.ssh eg /home/lbt/.ssh> | Folder path: <your home directory/.ssh eg /home/lbt/.ssh> | ||
Folder name: ssh | Folder name: ssh | ||
Latest revision as of 19:48, 10 August 2013
Contents |
[edit] Introduction
The Mer VM SDK is intended for use with QtCreator, on non-linux machines and on machines where a chroot-based SDK is not desired.
The SDK has 3 significant areas:
- Qt Creator: this runs on your host machine and (with the Mer plugin) allows you to manage application development, the SDK VM and your targets.
- SDK Virtual Machine: This contains all the Mer development toolchains and tools
- Development Target(s): these contain QML components, headers and libraries for your targets (eg Nemo, Plasma Active or vendor supplied targets)
[edit] Virtualisation
The Mer SDK uses Oracle's VirtualBox as the virtualisation engine. The website at https://www.virtualbox.org/ has a a lot of useful information.
Other virtualisation solutions should work without any issues. The main requirement is the ability to support shared folders.
[edit] Pre-Requisites
- VirtualBox version 4.18 or higher (should be 4.x).
- Suitable hardware with correct BIOS settings to allow VirtualBox to run
- Linux host (we intend to support other OSes 'soon')
[edit] Prepare Image
Download the SDK vmdk from http://img.merproject.org/images//web/henrik/6-20121115-132446/mer-sdk-i486-wip-sda.vdi.bz2
Then unzip the image (it's a very large file)
bunzip2 mer-sdk*vdi.bz2
[edit] Create the VM
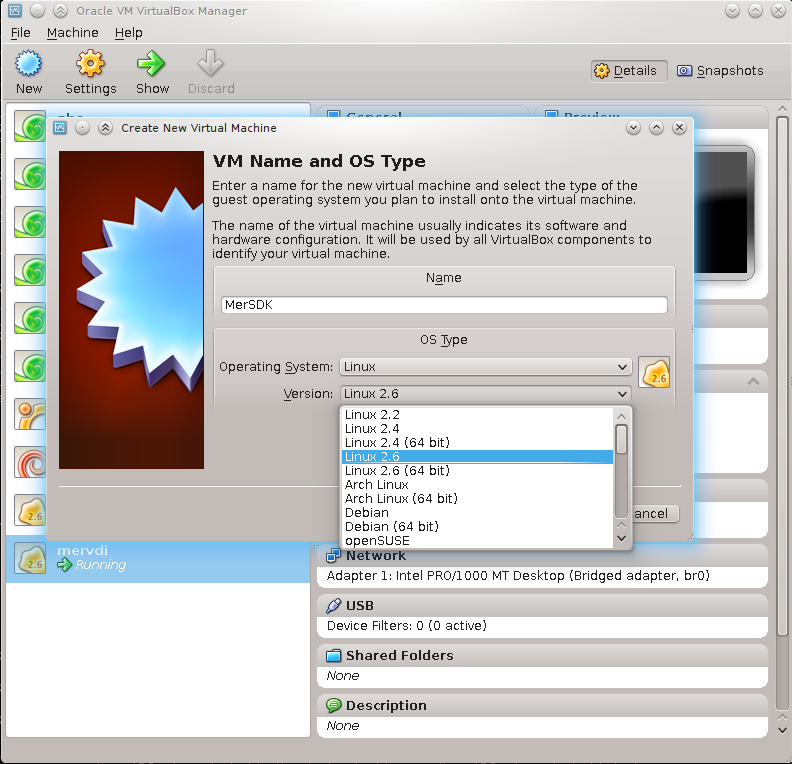
Run the VirtualBox manager and create a new machine called MerSDK with Linux/2.6 (32bit)
For larger builds allocate a substantial amount of memory (eg 2048Mb)
Select "Use existing hard disk" and pick the vdi you just downloaded/created
Now select create to make the VM.
Don't boot/start the VM until you have setup the shared folders or they will not be accessible.
[edit] Setting up and Networking
Select the MerSDK VM and then pick Settings
In System/Motherboard enable IO APIC.
In System/Processor enable PAE/NX and allocate as many CPUs as your host has.
This is not an emulator so there is no point setting any special Display settings.
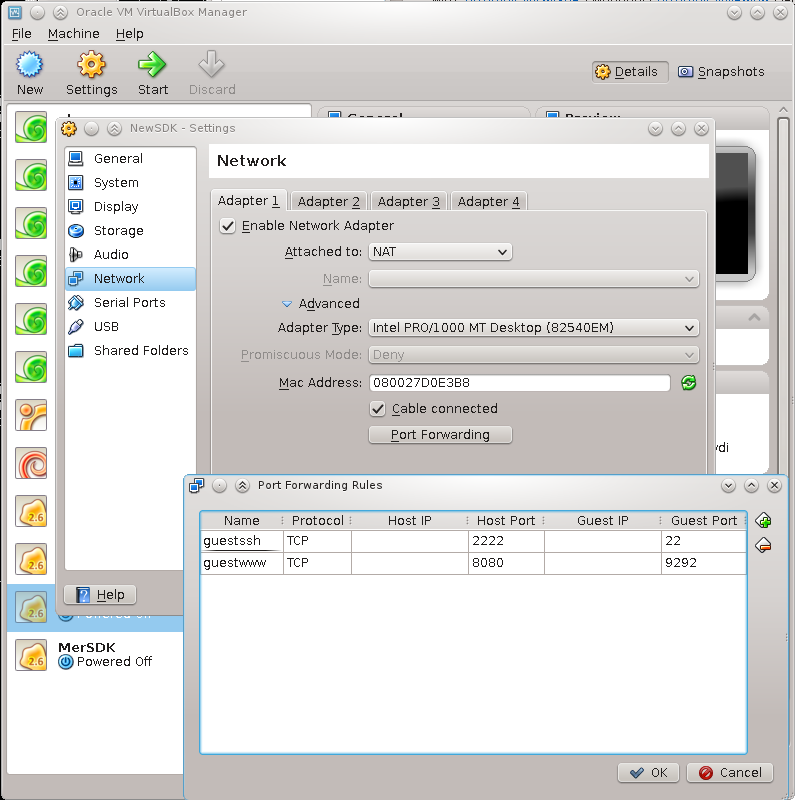
In Networking set Adapter 1 to "NAT" ( see https://www.virtualbox.org/manual/ch06.html#network_nat ) since your VM will need to access the internet to perform updates.
Since it will need to act as a server for your local host we must setup port-forwarding too.
Select 'Advanced' and then 'Port Forwarding'. In the rules box add:
Name: guestssh
Protocol: TCP
Host Port: 2222
Guest Port: 22
and
Name: guestwww
Protocol: TCP
Host Port: 8080
Guest Port: 9292
[edit] Storage and Sharing your home, source and caches
Make sure /srv/mer/targets exists and is owned by you.
sudo mkdir -p /srv/mer/targets
sudo chown $USER /srv/mer/targets
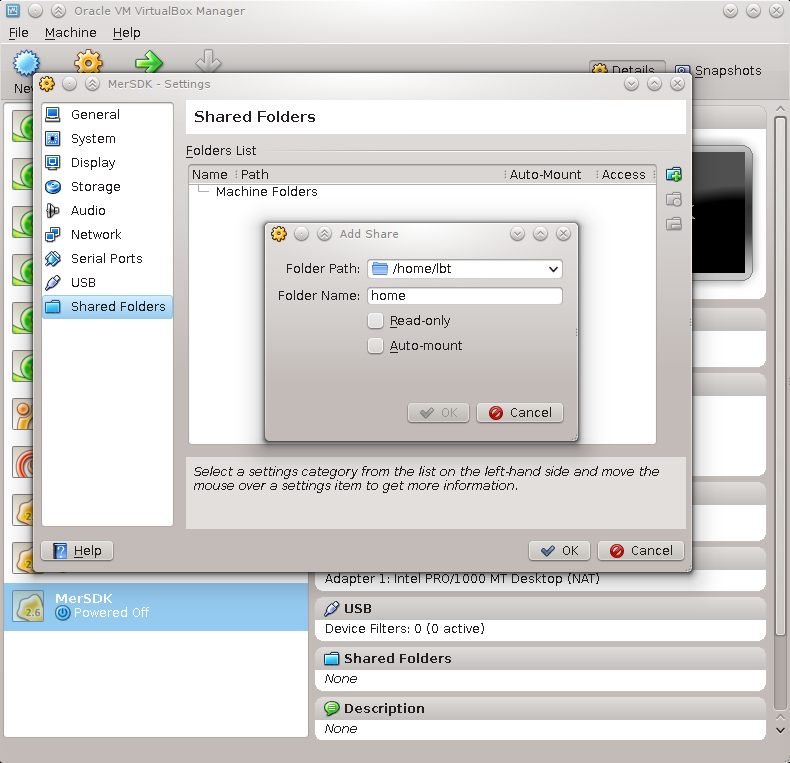
Under Settings -> Shared Folders (example screenshot below) add two Machine Folders with the
Folder path: <your home directory eg /home/lbt>
Folder name: home
and if you want to login via ssh to mersdk you also need to share your private mer-qt-creator-rsa key folder: Notice! this is a security risk if you let others login to the same mersdk you should NOT use $USER/.ssh folder. instead move mer-qt-creator private key elsewhere. Because you don't want others to see the other private keys.
Folder path: <your home directory/.ssh eg /home/lbt/.ssh>
Folder name: ssh
Read Only: true
and
Folder path: /srv/mer/targets
Folder name: targets
Do not tick the 'automount' box as that simulates a removable media device which will not work.
Note:Use the folder names as specified, else the VM may not boot.
The shared folder called 'home' will be mounted as the sdk user's 'mersdk' $HOME directory as the SDK boots. The 'targets' shared folder will be mounted as /srv/mer/targets and will store target device headers and qml files used by Qt Creator.
You may want to share additional source and cache directories from your host.
[edit]
To enable Virtualbox to support symlinks run this command before launching the VM:
 VBoxManage setextradata MerSDK VBoxInternal2/SharedFoldersEnableSymlinksCreate/home 1
 VBoxManage setextradata MerSDK VBoxInternal2/SharedFoldersEnableSymlinksCreate/targets 1
[edit] Ubuntu DNS
Ubuntu 12.10 and above has local DNS proxy running in address 127.0.1.1 not 127.0.0.1 . To enable DNS work with Ubuntu
VBoxManage modifyvm MerSDK --natdnshostresolver1 on
[edit] Running the SDK VM
You may now start the SDK VM. It will start an ssh service which can be accessed as:
ssh -p 2222 root@localhost
The root password is "rootme".
Ensure your ~/.ssh/authorized_keys files has your own public key in it and you can access mersdk user with no passwd:
cat ~/.ssh/id_rsa.pub >> ~/.ssh/authorized_keys  # works if your key is in ~/.ssh/id_rsa.pub (type this on your host)
ssh -p 2222 mersdk@localhost
This is important for QtCreator to work seamlessly.
If you get errors such as "Agent admitted failure to sign using the key" when testing from the command line "ssh -p2222 mersdk@localhost" or later Qt Creator can't create connection to VM try following
ssh-keygen -trsa (don't type a password when prompted)
cat ~/.ssh/id_rsa.pub >> ~/.ssh/authorized_keys
ssh-add
(in vm, your host home dir is mounted at /home/mersdk (mersdk's home on vm), so your ~/.ssh/autorized_keys is used for authorizing access to mersdk@localhost:2222)
[edit] Limitations
The SDK uses the Virtualbox shared folder mechanism which needs to support files stored on various hosts and does not support certain features:
- Symbolic links (see workaround above for linux hosts)
- Memory mapped (mmap) files
If this is a problem then virtualbox can be configured to store data on dedicated virtual or mapped drives (the details of this configuration are beyond the scope of this document).
[edit] Getting QtCreator
Currently you will need to build QtCreator on your local machine. Binary downloads should be available eventually and we hope the plugins will be merged upstream.
See https://qt.gitorious.org/+mer-qt-creator/qt-creator/mer-qt-creator
git clone git://gitorious.org/+mer-qt-creator/qt-creator/mer-qt-creator.git
cd mer-qt-creator
git checkout mer
qmake -r && make -jN && bin/qtcreator  # where N = NUM_OF_YOUR_CPUs * NUM_OF_CORES + 1
Fedora:
- use qmake-qt4 instead of qmake in the command above
- if you want Designer make sure the package qt-devel-private is installed.
[edit] Using QtCreator
There should be a Mer button on the left toolbar; if this is not present then you will need to either enable the Mer plugin (Help -> plugins) or ensure you have the correct QtCreator installed.
[edit] Add a target
In the SDK Control Center (http://localhost:8080) go to Targets and add a new target.
For Nemo:
- select Mer-SB2-armv7hl as the toolchain
- select nemo_n9_min as the target name
- select
http://img.merproject.org/images//web/lbt/2-20121111-184729/image.tar.bz2 as the rootfs url
Then 'add'
This will take a while but the progress will be shown at the bottom of the screen.
Once this is installed go to : Tools -> options -> Mer -> Targets and add the target. It should appear as a subdirectory of /srv/mer/targets/
The process takes a few seconds, connects to the VM and checks the compiler etc. It then says "Successfully added target".
Now you have a Mer Kit.
[edit] VM is not registered
If you get "VM is not registered" when testing connection to Mer SDK VM, shutdown VM, close VirtualBox manager and move MerSDK entry to the top in
~/.VirtualBox/VirtualBox.xml:
   <MachineRegistry>
     ...
     <MachineEntry uuid="{looooong-uuid-here}" src="/path-to/VirtualBox VMs/MerSDK/MerSDK.vbox"/>
     ...
   </MachineRegistry>
make it look:
   <MachineRegistry>
     <MachineEntry uuid="{looooong-uuid-here}" src="/path-to/VirtualBox VMs/MerSDK/MerSDK.vbox"/>
     ...
   </MachineRegistry>
Fix is on its way (as of 7/12/2012)
[edit] No SDK Control Center
If you press "upgrade" in SDK Control Center, after reboot it will not start anymore (as of 3/12/2012), to fix (in VM):
[root@localhost ~]# ln -s /usr/lib/systemd/user/sdk-webapp.service /etc/systemd/system/multi-user.target.wants/
Fix is on its way (as of 7/12/2012)
[edit] Adding a Device
Go to Tools -> Options -> Devices and 'Add' then pick a 'Generic Linux Device'
Follow the wizard to make a device
[edit] Check the Kit
Go to Tools -> Options -> Build & Run
You should see several tabs; the Qt Versions and Compilers should have the values filled in for your Mer target.
In the Kits tab there will be a new Kit for your target; select that. You can add a device here for deployment if you like.


