The Mer Wiki now uses your Mer user account and password (create account on https://bugs.merproject.org/)
Platform SDK on VirtualBox
Contents |
Introduction
The Mer VM SDK is intended for use with QtCreator, on non-linux machines and on machines where a chroot-based SDK is not desired.
The SDK has 3 significant areas:
- Qt Creator: this runs on your host machine and (with the Mer plugin) allows you to manage application development, the SDK VM and your targets.
- SDK Virtual Machine: This contains all the Mer development toolchains and tools
- Development Target(s): these contain QML components, headers and libraries for your targets (eg Nemo, Plasma Active or vendor supplied targets)
Virtualisation
The Mer SDK uses Oracle's VirtualBox as the virtualisation engine. The website at https://www.virtualbox.org/ has a a lot of useful information.
Other virtualisation solutions should work without any issues. The main requirement is the ability to support shared folders.
Pre-Requisites
- VirtualBox version 4.18 or higher (should be 4.x).
- Suitable hardware with correct BIOS settings to allow VirtualBox to run
- Linux host (we intend to support other OSes 'soon')
Prepare Image
Download the SDK vmdk from http://img.merproject.org/images//web/henrik/6-20121115-132446/mer-sdk-i486-wip-sda.vdi.bz2
Then unzip the image (it's a very large file)
bunzip2 mer-sdk*vdi.bz2
Create the VM
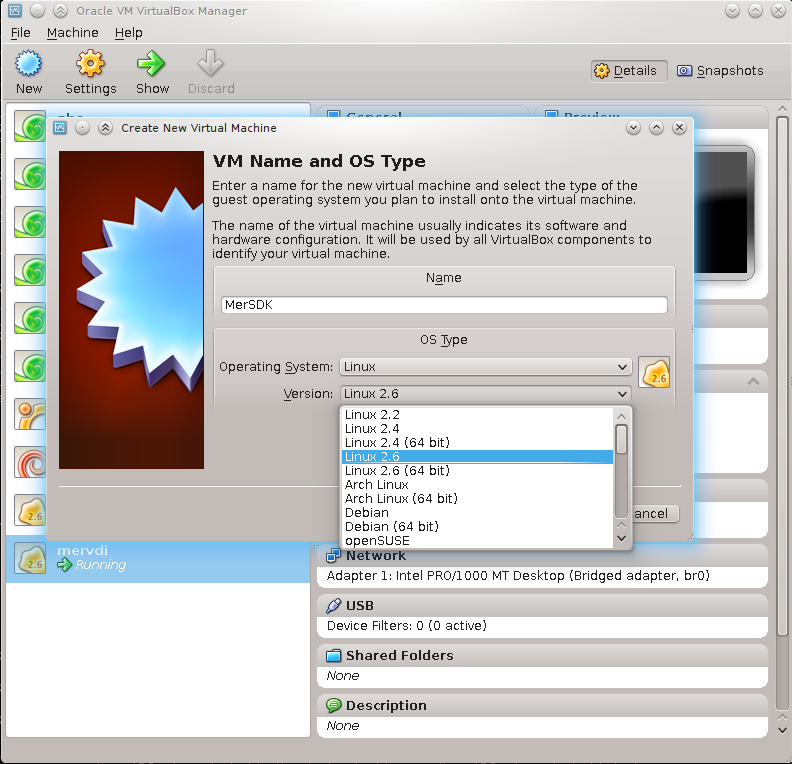
Run the VirtualBox manager and create a new machine called MerSDK with Linux/2.6 (32bit)
For larger builds allocate a substantial amount of memory (eg 2048Mb)
Select "Use existing hard disk" and pick the vdi you just downloaded/created
Now select create to make the VM.
Don't boot/start the VM until you have setup the shared folders or they will not be accessible.
Setting up and Networking
Select the MerSDK VM and then pick Settings
In System/Motherboard enable IO APIC.
In System/Processor enable PAE/NX and allocate as many CPUs as your host has.
This is not an emulator so there is no point setting any special Display settings.
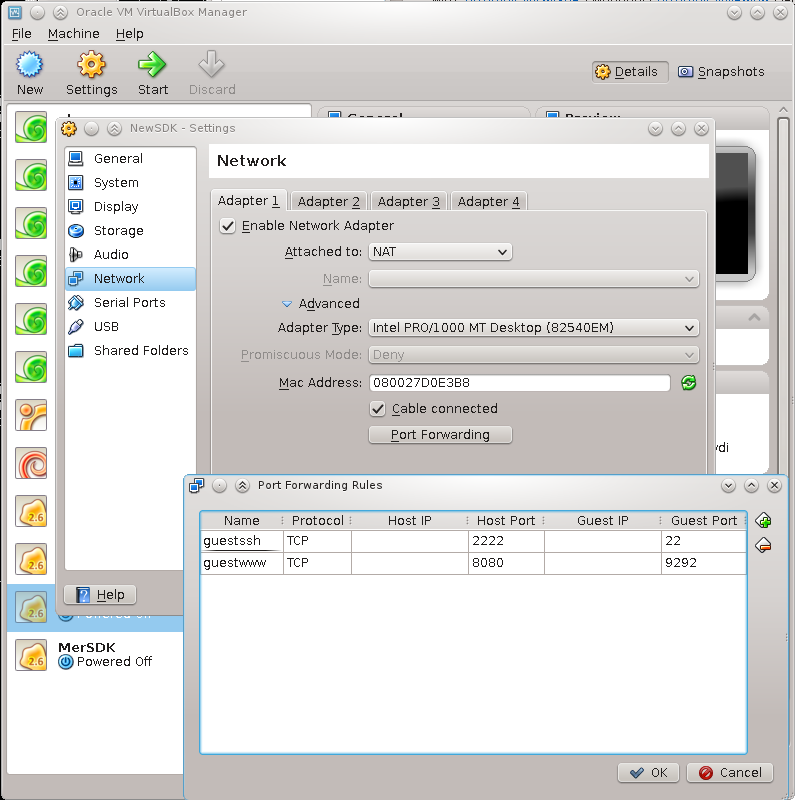
In Networking set Adapter 1 to "NAT" ( see https://www.virtualbox.org/manual/ch06.html#network_nat ) since your VM will need to access the internet to perform updates.
Since it will need to act as a server for your local host we must setup port-forwarding too.
Select 'Advanced' and then 'Port Forwarding'. In the rules box add:
Name: guestssh
Protocol: TCP
Host Port: 2222
Guest Port: 22
and
Name: guestwww
Protocol: TCP
Host Port: 8080
Guest Port: 9292
Storage and Sharing your home, source and caches
Make sure /srv/mer/targets exists and is owned by you.
sudo mkdir -p /srv/mer/targets
sudo chown $USER /srv/mer/targets
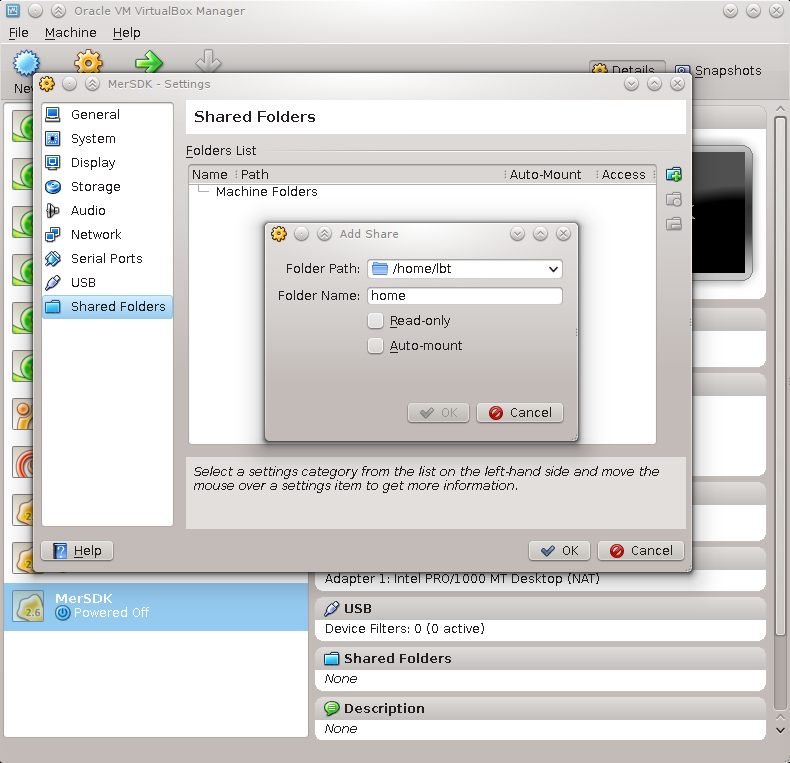
Under Settings -> Shared Folders (example screenshot below) add two Machine Folders with the
Folder path: <your home directory eg /home/lbt>
Folder name: home
and
Folder path: /srv/mer/targets
Folder name: targets
Do not tick the 'automount' box as that simulates a removable media device which will not work.
Note:Use the folder names as specified, else the VM may not boot.
The shared folder called 'home' will be mounted as the sdk user's 'mersdk' $HOME directory as the SDK boots. The 'targets' shared folder will be mounted as /srv/mer/targets and will store target device headers and qml files used by Qt Creator.
You may want to share additional source and cache directories from your host.
To enable Virtualbox to support symlinks run this command before launching the VM:
 VBoxManage setextradata MerSDK VBoxInternal2/SharedFoldersEnableSymlinksCreate/home 1
 VBoxManage setextradata MerSDK VBoxInternal2/SharedFoldersEnableSymlinksCreate/targets 1
Running the SDK VM
You may now start the SDK VM. It will start an ssh service which can be accessed as:
ssh -p 2222 root@localhost
The root password is "rootme".
Ensure your ~/.ssh/authorized_keys files has your own public key in it and you can access mersdk user with no passwd:
cp ~/.ssh/id_rsa.pub ~/.ssh/authorized_keys  # works if your key is in ~/.ssh/id_rsa.pub.
ssh -p 2222 mersdk@localhost
This is important for QtCreator to work seamlessly.
If you get errors such as "Agent admitted failure to sign using the key" when testing from the command line "ssh -p2222 mersdk@localhost" or later Qt Creator can't create connection to VM try following
ssh-keygen -trsa (don't type a password when prompted)
cp ~/.ssh/id_rsa.pub authorized_keys
ssh-add
(in vm, your host home dir is mounted at /home/mersdk (mersdk's home on vm), so your ~/.ssh/autorized_keys is used for authorizing access to mersdk@localhost:2222)
Limitations
The SDK uses the Virtualbox shared folder mechanism which needs to support files stored on various hosts and does not support certain features:
- Symbolic links (see workaround above for linux hosts)
- Memory mapped (mmap) files
If this is a problem then virtualbox can be configured to store data on dedicated virtual or mapped drives (the details of this configuration are beyond the scope of this document).
Getting QtCreator
Currently you will need to build QtCreator on your local machine. Binary downloads should be available eventually and we hope the plugins will be merged upstream.
See https://qt.gitorious.org/+mer-qt-creator/qt-creator/mer-qt-creator
git clone git://gitorious.org/+mer-qt-creator/qt-creator/mer-qt-creator.git
cd mer-qt-creator
git checkout mer
qmake -r && make -jN && bin/qtcreator
Fedora:
- use qmake-qt4 instead of qmake in the command above
- if you want Designer make sure the package qt-devel-private is installed.
Using QtCreator
There should be a Mer button on the left toolbar; if this is not present then you will need to either enable the Mer plugin (Help -> plugins) or ensure you have the correct QtCreator installed.
Add a target
In the SDK Control Center go to Targets and add a new target.
For Nemo:
- select Mer-SB2-armv7hl as the toolchain
- select nemo_n9_min as the target name
- select
http://img.merproject.org/images//web/lbt/2-20121111-184729/image.tar.bz2 as the rootfs url
Then 'add'
This will take a while but the progress will be shown at the bottom of the screen.
Once this is installed go to : Tools -> options -> Mer -> Targets and add the target. It should appear as a subdirectory of /srv/mer/targets/
The process takes a few seconds, connects to the VM and checks the compiler etc. It then says "Successfully added target".
Now you have a Mer Kit.
Adding a Device
Go to Tools -> Options -> Devices and 'Add' then pick a 'Generic Linux Device'
Follow the wizard to make a device
Check the Kit
Go to Tools -> Options -> Build & Run
You should see several tabs; the Qt Versions and Compilers should have the values filled in for your Mer target.
In the Kits tab there will be a new Kit for your target; select that. You can add a device here for deployment if you like.


